ProWatchly System Setup & Deployment Guide
From Preparation to Execution
1. Installing Ubuntu 22.04 LTS
- Install Ubuntu 22.04 LTS on the system.
-
Create an administrator account with the following credentials:
- Username: prowatchlyadmin
- Password: prowatchly@123!
-
Update the system packages immediately after installation:
sudo apt-get update
sudo apt-get upgrade -y
2. Installing ProWatchly Application
-
Download RustDesk (Remote Software)
⬇️ Download Remote software RustDesk -
Install the downloaded file. Navigate to the download directory (usually
~/Downloads) and run:sudo apt --fix-broken install sudo apt install ./rustdesk.deb -
Set the permanent remote-access password
- Open the RustDesk application.
- Click the Settings icon.
- Go to the Security tab.
- Set an unattended access password.
RustDesk Guidance
After installation, be sure to set a persistent password for remote access within RustDesk.
Configure the one-time password tohelloClient1for both users (prowatchlyadminandclient).
Note: Passwords are case-sensitive.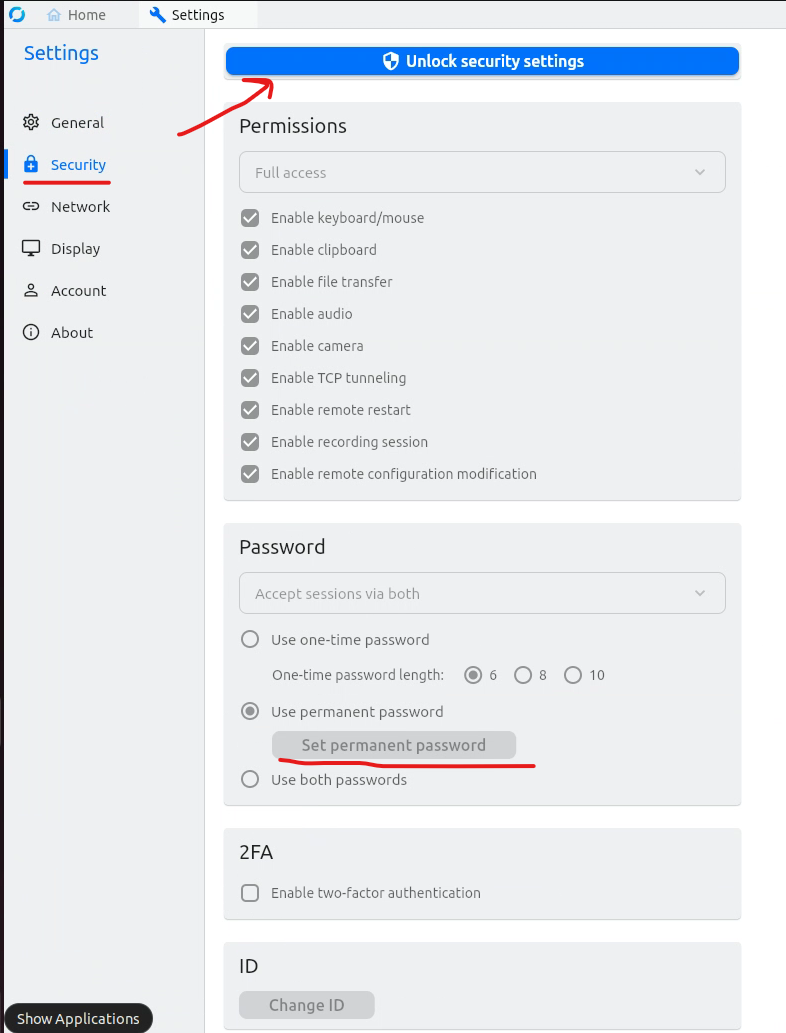 RustDesk password setup overview
 -
Download the ProWatchly setup package
⬇️ Download ProWatchly Setup -
Create a working directory:
mkdir /home/prowatchlyadmin/prowatchly
If the default home folder is/home/prowatchlyadming, create theprowatchlydirectory within that path instead. -
Move the ZIP file into the folder and unzip it:
unzip prowatchly.zip -
Navigate to the installer directory and run the setup:
When the installer finishes, reboot the system withcd /home/prowatchlyadmin/prowatchly/prowatchlyAppSetup bash install.shsudo reboot. -
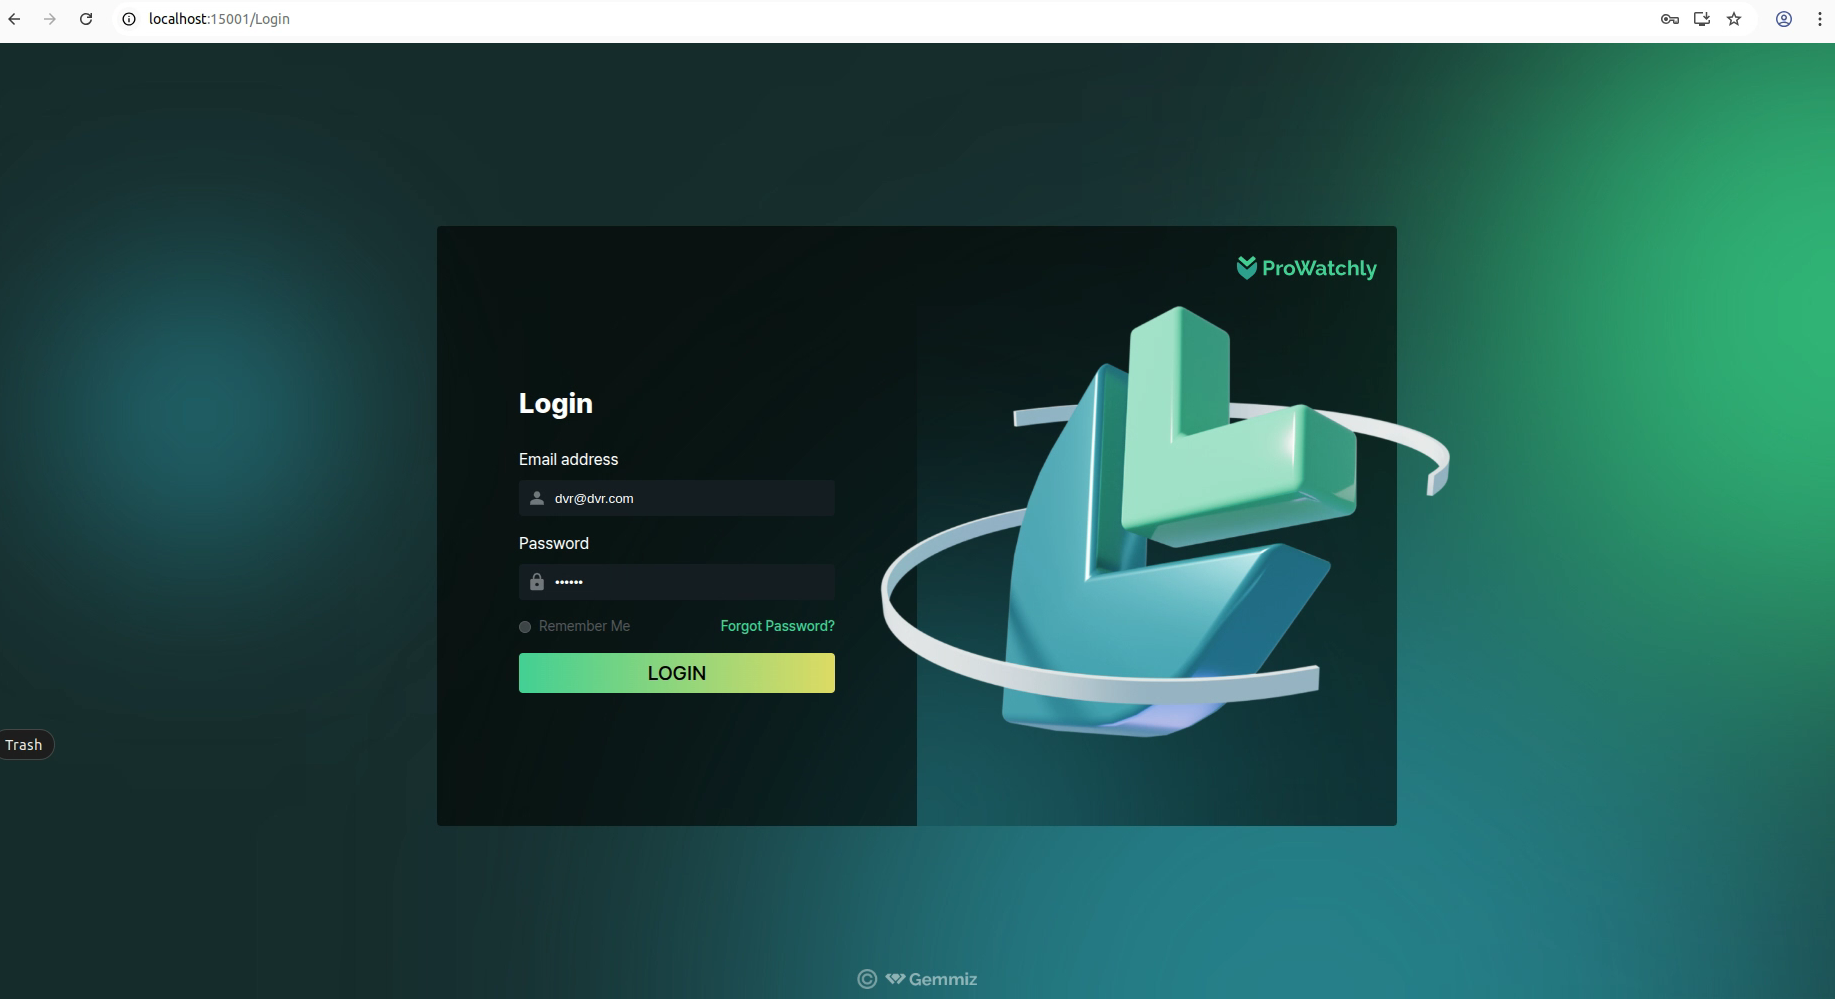
After rebooting, sign in with the client account:
- Username:
client - Password:
helloclient
http://localhost:15001to verify the installation. - Username:
-
Reboot once more and log in with the prowatchlyadmin account:
- Username:
prowatchlyadmin - Password:
prowatchly@123!
After it finishes, reboot withcd /home/prowatchlyadmin/prowatchly/prowatchlyAppSetup bash auto_prowatchlylogin.shsudo reboot; the client account will auto-login and ProWatchly will launch within 1–5 minutes. - Username:
ProWatchly login overview
Check Power & Display Settings
Go to Settings → Power to confirm sleep and screen-off timers, switching to Performance mode if needed.
Review screen-lock options under Settings → Privacy as well.
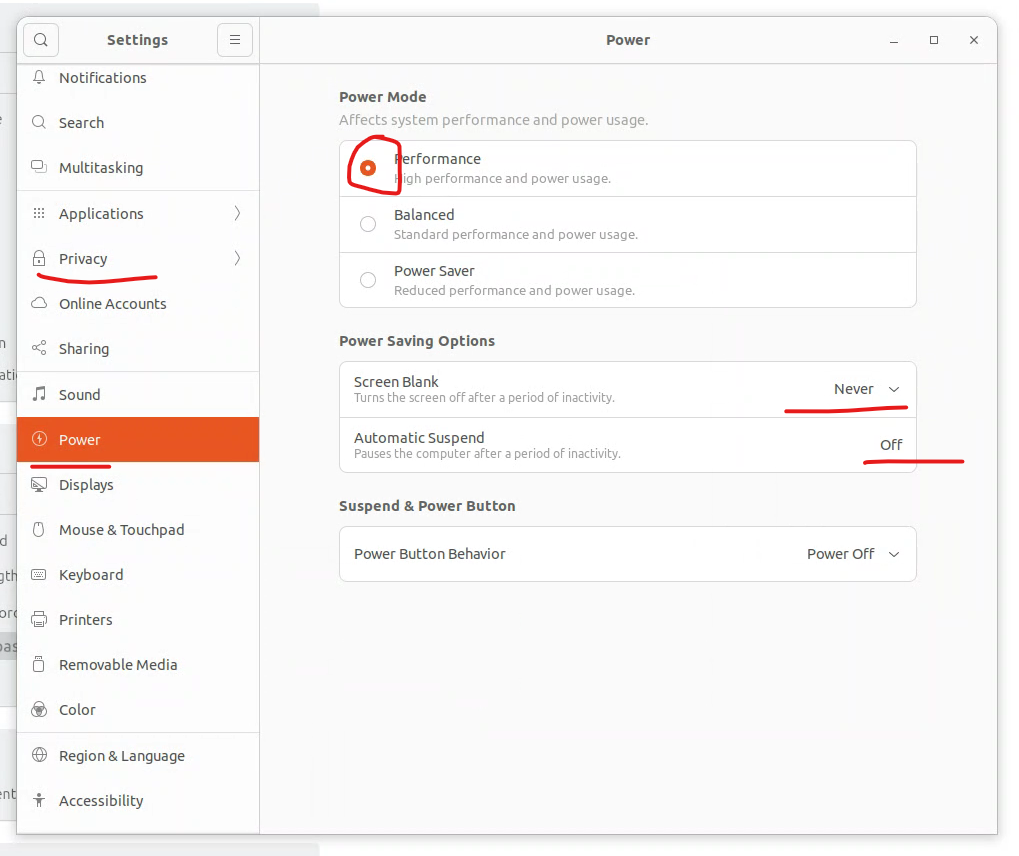
Go to Settings → Power to confirm sleep and screen-off timers, switching to Performance mode if needed.
Review screen-lock options under Settings → Privacy as well.
Performance & Screen settings overview
3. Telegram Bot Setup
- Create a dedicated Telegram group for the site.
- Add the official bot: @prowatchly_bot
- Send the message
Hi @prowatchly_botto activate. - Complete the registration form as guided by the bot.
4. Connecting Cameras via DVR
Using a Dahua DVR (Example)
- Connect all cameras and a monitor to the DVR.
- Use a LAN (RJ45) cable to connect the DVR to your computer.
- Find or set the DVR’s IP address (e.g.,
192.168.1.110). - Configure your PC with an IP in the same subnet (e.g.,
192.168.1.112).
RTSP Stream Setup
- RTSP URL format for Dahua:
rtsp://admin:trace3@123@192.168.1.110:554/cam/realmonitor?channel=2&subtype=0 - Test the stream with VLC → Media → Open Network Stream.
- Use the verified RTSP URL in the ProWatchly registration page.
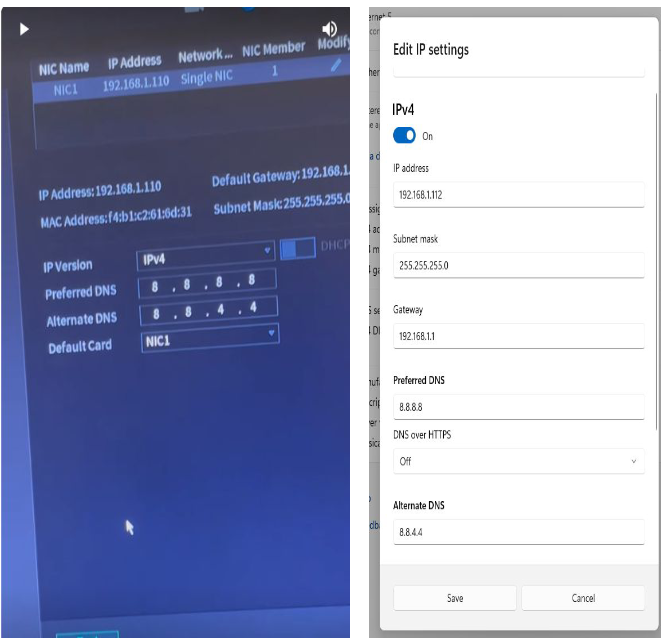
Dahua DVR configuration
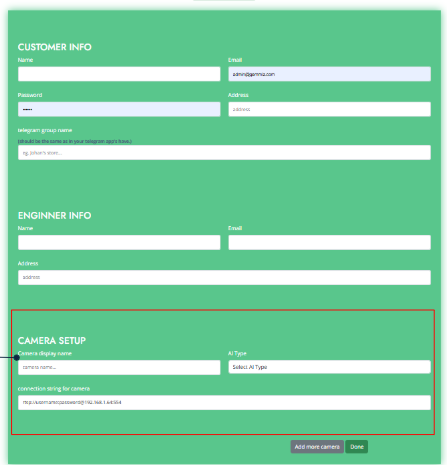
ProWatchly registration page
5. Connecting Cameras via PoE
- Connect the PoE camera to the PoE switch.
- Link the switch to the system via LAN cable.
- Check or change the camera IP via its web interface.
- Keep all devices in the same subnet (e.g., Camera
192.168.1.100, System192.168.1.101). - Use the RTSP format recommended in the camera documentation.
- After testing, add the stream to ProWatchly and confirm the live view.
6. Frequently Asked Questions
Do I need to set the network for each camera?
When using a PoE switch, you only need to configure the network once. Be sure to assign a unique IP address to every camera.
Will the camera remember its IP address?
- Yes—once configured, the IP remains stored on the camera.
- Reconfiguration is required only after a factory reset or manual change.
- Use tools like SADP or the camera’s web interface to confirm the IP.
7. Different DVR OR IP CAMERA OR POE CONNECTION INFO
Connecting Cameras via DVR
DAHUA
Dahua Installation Overview
RTSP URL format for Dahua:
rtsp://admin:trace3@123@192.168.1.110:554/cam/realmonitor?channel=2&subtype=0
SecureEye
- cam1:
rtsp://admin:admin123@192.168.29.201:554/main/ - cam2:
rtsp://admin:admin123@192.168.29.211:554/main/
Each camera can operate on a different IP address.
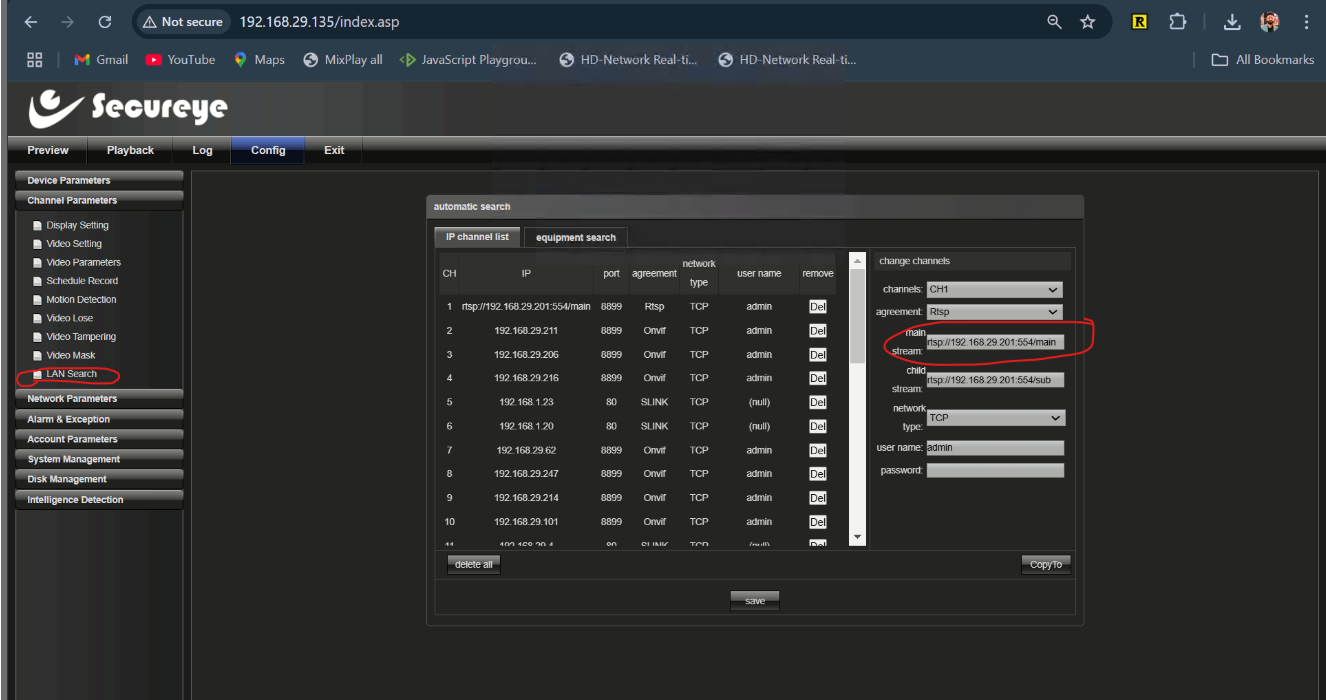
SecureEye configuration overview
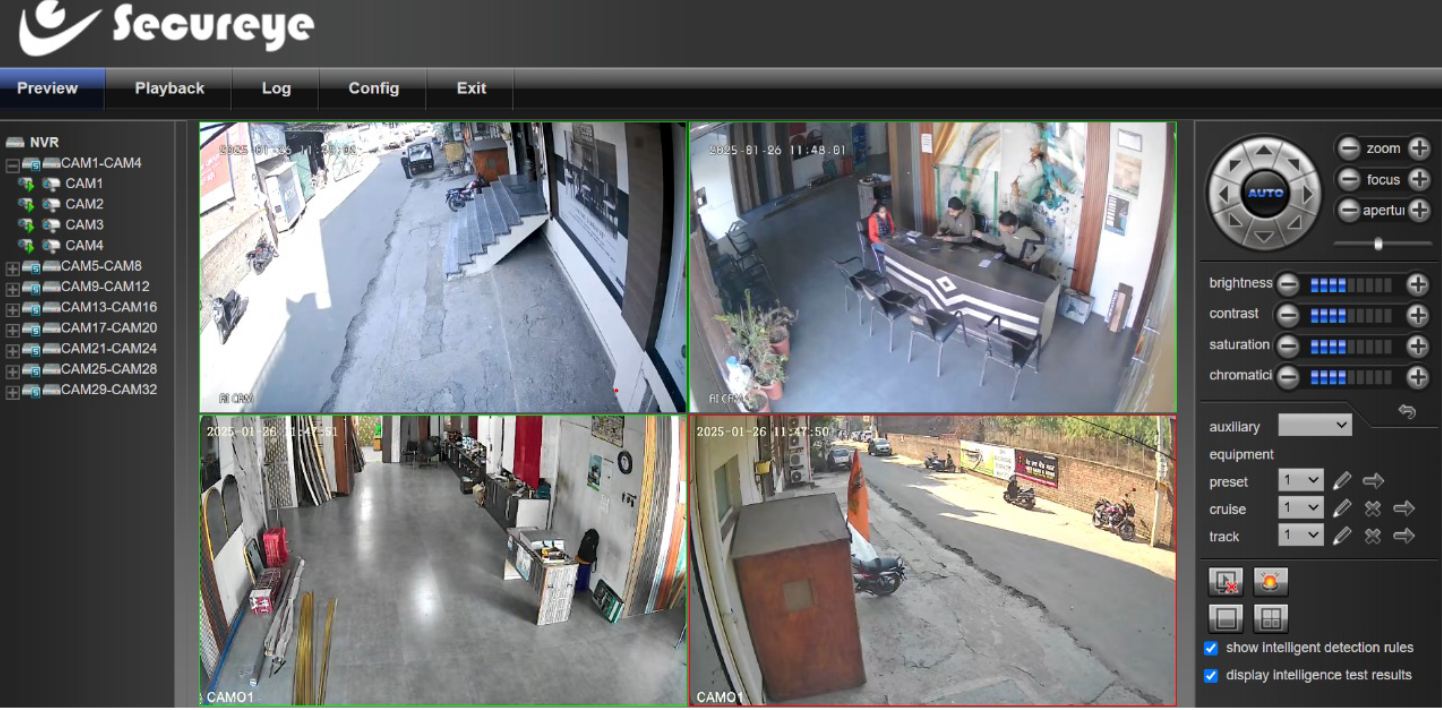
SecureEye live view
Camplus
- Example RTSP:
rtsp://admin:prowatchly123@192.168.1.100:80/rtsp/streaming?channel=02&subtype=0 - Connect the cameras to the DVR, then connect the DVR to the PC with a LAN cable.
- You can use the default configuration—no need to enable dynamic IP.
- Ensure the cameras/DVR and PC are on the same network.
- Assign the PC a static IP within the DVR’s subnet (e.g., DVR
192.168.1.100, PC192.168.1.101). - Refer to the example below for a sample network configuration.
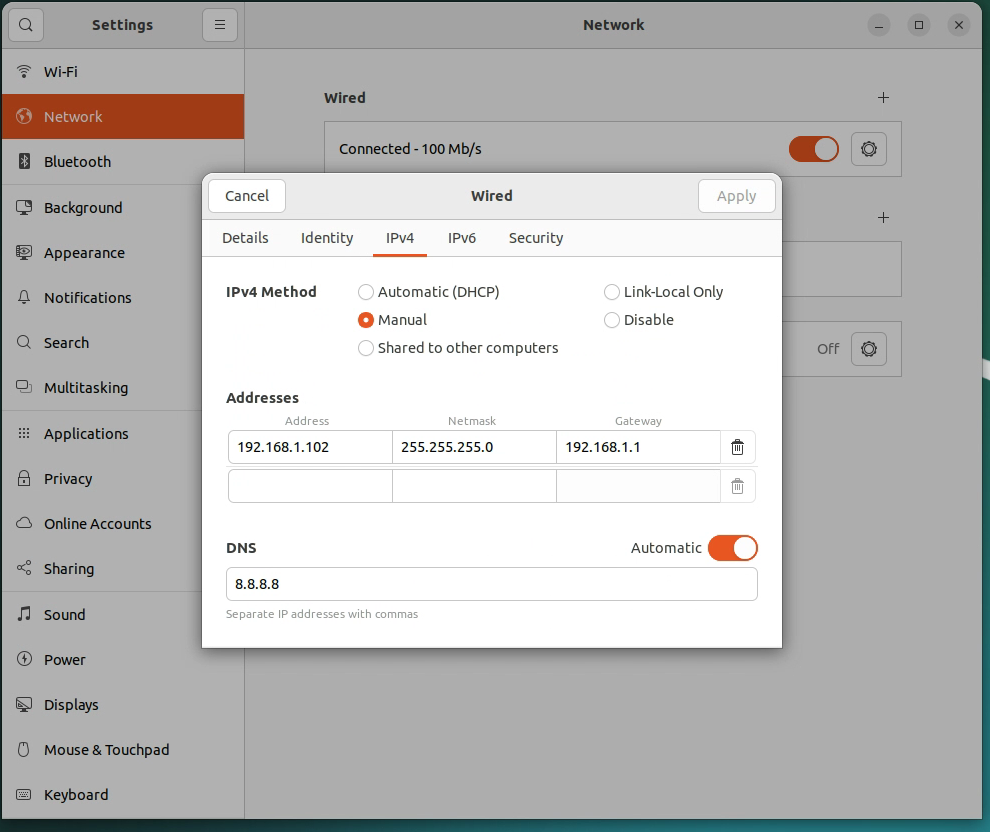
Camplus DVR settings configuration
After modifying network settings, reboot the computer to confirm they take effect.
Connecting Cameras via POE
HANWA IP CAMERA SETTINGS
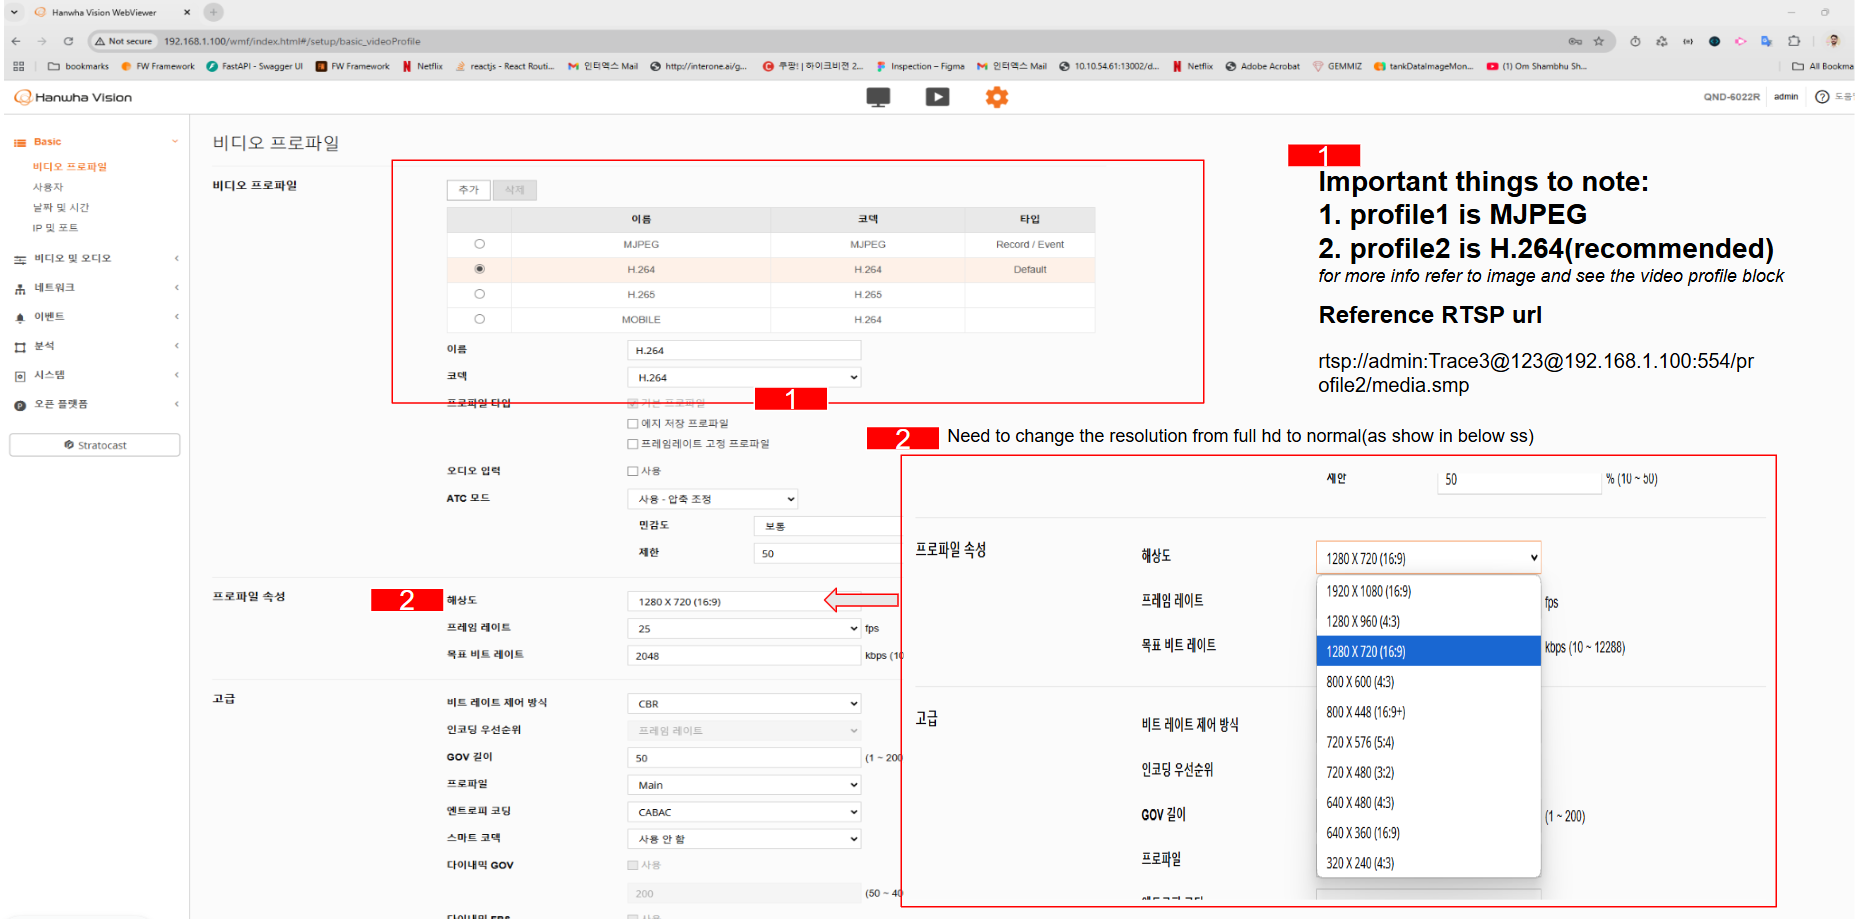
Hanwa POE settings configuration
HikVision
Always restart the computer after changing network settings to ensure they are applied.
- After rebooting, reach the camera web interface via its default IP (e.g.,
192.168.1.64). - Log in with the default credentials (typically
admin/admin123or as noted in the manual). - Update the camera IP so it matches your network subnet (e.g.,
192.168.1.65). - Save the configuration and ping the new IP to verify connectivity.